


A tribute to the landscape and weather of England’s Peak District, Laddow is a yoked sweater worked in the round from the top down, featuring stranded colourwork. Inspired by techniques from Bohus Stickning, the yoke is worked with a combination of knits and purls to blend the colours into a hazy moorland vista.
Worked in a traditional jumperweight yarn, this sweater brings joy to cooling weather and darkening evenings, while the blended colourwork is a forgiving canvas for experimenting with your own seasonal palette. The shallow yoke will suit most body shapes, while gentle side shaping discretely hugs your curves for a flattering fit.
The cast-on and bind-off have been carefully chosen for their properties, so give them a go if you haven’t tried them before and pick up a new skill!

MATERIALS
MC: 890, {1000, 1120, 1240}, {1370, 1480, 1600} metres // 970, {1100, 1230, 1360}, {1490, 1610, 1740} yards 4ply shetland wool in black;
CC1, CC2, CC3, CC5: 40, {45, 50, 55}, {60, 65, 70} metres // 45, { 50, 55, 60}, {65, 70, 80} yards each 4ply in shades and yarns listed in APPENDIX i.
CC4, CC6: 15, {15, 15, 20}, {20, 20, 25} metres // 15, 15, 20}, {20, 25, 25} yards each 4ply in shades and yarns listed in APPENDIX i.
Needle A: 40cm //16” circular needle that gets you gauge;
Needle B: 80cm // 32” circular gauge needle circular needle the same size as Needle A;
Needle C: doublepointed needles, or preferred needle for working small circumferences, the same size as Needle A;
Needle D: 40cm //16” circular needle two sizes smaller than Needle A;
Needle E: 80cm // 32” circular needle two sizes smaller than Needle A;
Needle F: doublepointed needles, or preferred needle for working small circumferences, two sizes smaller than Needle A;
Stitch markers;
Waste yarn.
GAUGE
24 sts x 39 rows = 10cm // 4 inches on larger needles in stockinette worked in the round, washed;
Recommended needle size = 3.5mm // US4;
SIZING & DIMENSIONS
Instructions are given for approximate chest circumferences: 76cm, {86cm, 96cm, 106cm}, {117cm, 127cm, 137cm} // 30.25″, {34.25″, 38.25″, 42.25″}, {46.75″, 50.75″, 54.75″}.
Laddow is designed to fit with slight negative ease ( 5cm // 2”), so choose a size slightly smaller than your bust circumference.
Numbers provided in the pattern are set out in the order of sizes that appear above. You may find it helpful to mark or highlight your size and corresponding numbers in the pattern;
NOTE: If your proportions are significantly different to those shown on the schematic, you will need to customise the fit yourself. If you are unsure how to do this, please refer to Little Red in the City by Ysolda Teague or Fit to Flatter by Amy Herzog.
ABBREVIATIONS
k = knit;
kfb = knit into the front and back loops of the next stitch (1 stitch increased);
k2tog = knit 2 together (1 stitch decreased);
m1L (pwise) = insert LH needle into the bar (between last stitch and next stitch) from front to back; knit (purl) through the back loop (1 stitch increased);
m1R (pwise) = insert LH needle into the bar (between last stitch and next stitch) from back to front; knit (purl) through the front loop (1 stitch increased);
pm = place marker;
p = purl;
sl m = slip marker;
ssk = slip the next 2 stitches as if to knit, replace them on LH needle as they appear, and knit them together (1 stitch decreased);
w + t = wrap and turn; work a short row turn here, whichever you like (see APPENDIX i).
YOKE
Using MC and Needle A, cast on 104, {108, 112, 116}, {120, 128, 132} stitches using the longtail or thumb method. Join to work in the round. Place marker for start of round.
Ribbing round: * K 1, p 1, repeat from * to end of round.
Work ribbing for 12 rounds, or until collar measures 3cm // 1.25”.
Change to larger short circular. Knit one round.
Work short row neck shaping as follows:
Row 1 [WS]:P 34, {36, 38, 40}, {40, 42, 44}, w + t.
Row 2 [RS]: K 28, {30, 32, 34}, {34, 36, 38}, w + t.
Row 3 [WS]: P 22, {24, 26, 28}, {28, 30, 32}, w + t.
Row 4 [RS]: K 16, {18, 22, 24}, {24, 24, 26}, w + t.
Row 5 [WS]: P 10, {12, 18, 20}, {20, 18, 20}, w + t.
Sizes 3, 4, 5, 6 & 7 only:
Row 6 [RS]: K , {, 14, 16}, {16, 14, 16}, w + t.
Row 7 [WS]: P , {, 10, 12}, {12, 10, 12}, w + t.
All sizes: K to end of round, working wrapped sts as you arrive at them.
Work even for one round, working remaining wrapped sts as you arrive at them.
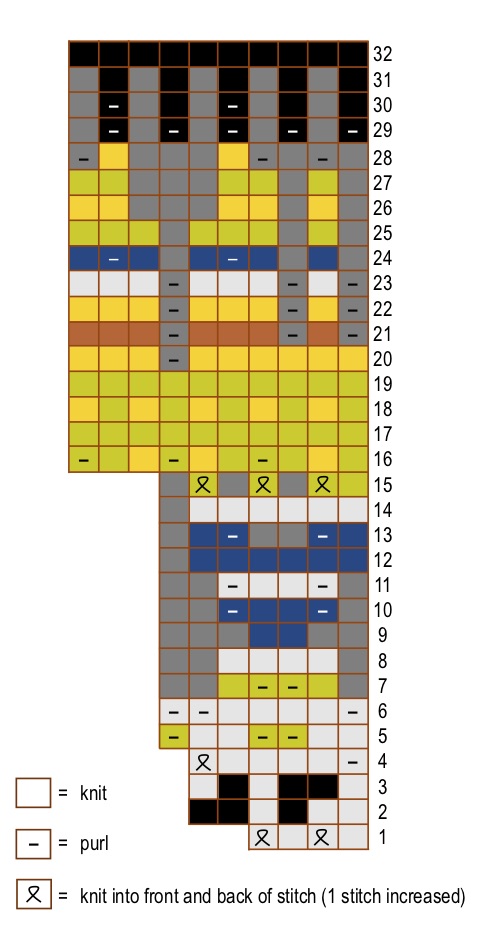
Follow the Laddow chart (page 7) 26 {27, 28, 29}, {30, 32, 33} times over each round, working increases on Rounds 1, 4 & 15.
Change to Needle B when necessary.
Written instructions for increase rounds only (all sizes):
Round 1 [CC1]: * K 1, kfb, repeat from * to end. 156, {162, 168, 174}, {180, 192, 198} sts.
Round 4 [CC1]: * P1, k 4, kfb, repeat from * to end. 182, {189, 196, 203}, {210, 224, 231} sts.
Round 15 [CC2 & CC3]: * [CC2] K 1, ([CC2] kfb, [CC3] k 1) three times, repeat from * to end. 260, {270, 280, 290}, {300, 320, 330} sts.
Size 3 only
Round 33 (increase round): * K 10, m 1, repeat from * to end of round.
-, {-, 308, -}, {-, -, -} sts.
Size 4 only
Round 33 (increase round): * K 6, m 1, repeat to 2 sts from end of round, k 2.
-, {-, -, 338}, {-, -, -} sts.
Size 5 only
Round 33 (increase round): * K 4, m 1, repeat from * to 4 sts from end of round, k 4.
-, {-, -, -}, {374, -, -} sts.
Size 6 only
Round 33 (increase round): * K 4, m 1, repeat from * to end of round.
-, {-, -, -}, {-, 400, -} sts.
Size 7 only
Round 33 (increase round): * K 7, m 1, repeat from * to 1 sts from end of round, k 1.
-, {-, -, -}, {-, -, 377} sts. Work even for 10 rounds.
Final yoke increase round: * K 6, m 1, repeat from * to 5 sts from end of round, k 5, m 1.
-, {-, -, -}, {-, -, 440} sts.
All sizes
Work even for 27, {37, 41, 46}, {51, 54, 48} rounds or until yoke measures 15, {18, 19, 20.5}, {21.5, 22, 23.5} cm // 6, {7, 7.5, 8}, {8.5, 8.75, 9.25}”.
260, {270, 308, 338}, {374, 400, 440} sts.
SEPARATE SLEEVES + BODY
Sleeve stitches are transferred to waste yarn or stitch holders while body continues to be worked in the round. Markers are placed to indicate side seams while additional stitches are cast on for underarms.
Next round: Sl m, * transfer 53, {52, 59, 65}, {70, 75, 82} sts to waste yarn, cast on 7, {10, 10, 11}, {11, 13, 13} sts using backwards loop method, pm, cast on 7, {10, 10, 12}, {12, 14, 13} sts using backwards loop method, k 77, {83, 95, 104}, {117, 125, 138}, repeat from * once more.
182, {206, 230, 254}, {280, 304, 328} body sts.
BODY
The body is worked seamlessly in the round from underarm to bottom edge. If you wish to work a faux side seam, you can slip the first stitch after both side markers on alternate rounds.
Work in stockinette until body measures 10cm // 4” from underarm.
WAIST SHAPING
Gentle waist shaping takes place at the side seam markers using paired decreases. Decrease more frequently for more shaping, less frequently for less shaping, or omit altogether for a straight fit.
Decrease round: * K to 2 sts before m, k2tog, sl m, ssk, repeat from * once more.
Work even for 9 rounds.
Repeat the last 10 rounds four more times. 162, {186, 210, 234}, {260, 284, 308} sts.
Work even for 9 rounds.
HIP SHAPING
Stitches are increased at the sides using paired increases. Adjust as above.
Increase round: * K 1, m1L, k to 1 st before m, m1R, k 1, sl m, repeat from * once more.
Work even for 5 rounds.
Repeat the last 6 rounds four more times. 182, {206, 230, 254}, {280, 304, 328} sts.
Work even for 1, {5, 9, 15}, {21, 30, 38} rounds, or until body measures 33, {34, 35, 36.5}, {38, 40.5, 42.5} cm // 13.25, {13.5, 14, 14.5}, {15.25, 16.25, 17}” from underarm or 5cm // 2″ shorter than desired length.
Change to smaller long circular.
Ribbing round: * K 1, p 1, repeat from * to end of round.
Work ribbing for 20 rounds, or until ribbing measures 5cm // 2″.
Bind off using outline stitch bindoff (see notes).
Snip yarn and weave in end.
SLEEVES
Additional stitches are picked up from the underarm cast on and sleeves are worked in the round from underarm to cuff. Decreases take place either side of the start of round marker.
Using larger dpns (or your needle of choice for working small circumferences), pick up and knit 7, {10, 10, 11}, {11, 13, 13} sts from underarm caston sts, k 53, {52, 59, 65}, {70, 75, 82}, pick up and knit 7, {10, 10, 12}, {12, 14, 13} sts from underarm cast on sts.
67, {72, 79, 88}, {93, 102, 108} sts.
Pm for start of round. Work 1 round even.
Decrease round: K 1, ssk, k to 3 sts before m, k2tog, k 1.
Work even for 10, {9, 9, 7}, {7, 5, 5} rounds.
Repeat the last 11, {10, 10, 8}, {8, 6, 6} rounds 10 {11, 12, 14}, {15, 18, 18} more times.
45, {48, 53, 58}, {61, 64, 70} sts.
Work even if necessary until sleeve measures 35 {36, 36, 37.5}, {37.5, 38.5, 38.5} cm // 14 {14.5, 14.5, 15}, {15, 15.5, 15.5}” from underarm or 7cm // 2.75″ shorter than desired length.
Sizes 1, 3, & 5 only
Next round: K2tog, k to end of round. 1 st dec. 44, {, 52, }, {60, , } sts.
All sizes
Change to smaller dpns (or your needle of choice for working small circumferences).
Ribbing round: * K 1, p 1, repeat from * to end of round.
Work ribbing for 28 rounds, or until ribbing measures 7cm // 2.75″.
Bind off using outline stitch bindoff (see notes).
Snip yarn and weave in end.
FINISHING
Weave in ends.
Block gently to the dimensions shown on the schematic.
Head for the hills!
APPENDIX i – YARN SUGGESTIONS

APPENDIX ii – SHORT ROWS
I use German Short Rows, which are a pinless variation on Japanese Short Rows – I really recommend this method if you haven’t already tried it, it’s almost invisible.
Rox has a useful photo tutorial on Ravelry (although I think you need to be signed up to view). She also has videos for turning on RS (knit to purl) and turning on WS (purl to knit).
Want to know more about different short row methods? TECHknitter has prepared a comprehensive resource.
APPENDIX iii – LONG-TAIL CAST-ON
This is a brilliant cast on method that creates a mediumstretchy edge. Although some folk think it’s not the neatest edge for ribbing, I like its lack of bulk; a lot of the neater options don’t lie flat in the same way as this method.
TECHknitter breaks it down, and KnittingHelp shows you how in this video.
APPENDIX iv – OUTLINE STITCH BIND-OFF OR CASTING-ON CASTING-OFF
This bind off replicates the longtail or thumb cast on, and makes all your edges look like they were cast on and joined somewhere in the middle. It was a firm favourite of Elizabeth Zimmermann, who describes it in her most popular books. It can be found in both The Knitter’s Almanac (Dover; 1981. p.143) and Knitting Without Tears (Fireside; 1995. p.23 24).
The Purl Bee has a photo tutorial, or if you prefer videos, Rox has done a short video tutorial.
Other sources: Montse Stanley refers to it as the Stem Stitch Castoff in Knitter’s Handbook (3rd ed. David & Charles; 2007. p.90).