


A relaxed-fit spring tee with a devil-may-care attitude, Maggie May is knitted up quickly in worsted-weight yarn; just the ticket for perfecting a little insouciant rebellion during the in-between season.
Knitted in the round from the top down, using the contiguous method (developed by Susie Myers) to shape the shoulders and sleeve caps, while the front neckline is shaped with short rows, Maggie May is easy to try on as you go to ensure a perfectly louche fit. The edgings are left unfinished for added, um, edge.
Maggie May is designed to fit loosely but not shapelessly, and instructions are given for princess-style darts to nip in the underbust flatteringly for the busty gals.
Experiment with yarn weights to change the fabric drape – try super-oversized in a fine-weight yarn for something sheer and gauzy.
MATERIALS
Main Colour (MC): approx. 225, {255, 285, 315}, {350, 380, 410} metres // 245, {280, 310, 345}, {385, 415, 450} yards worsted weight yarn
Contrast Colour 1 (CC1): approx. 45, {50, 55, 65}, {70, 75, 85} metres // 50, {55, 60, 70}, {75, 85, 90} yards worsted weight yarn;
Contrast Colour 2 (CC2): approx. 190 {215, 245, 270}, {300, 325, 350} metres // 210 {235, 270, 295}, {330, 355, 385} yards worsted weight yarn;
For a plain version:
Approx. 460, {520, 585, 650}, {720, 780, 845} metres // 505, {570, 640, 710}, {790, 855, 925} yards worstedweight yarn
Needle A: 40cm // 16-inch circular needle, double-pointed needles, or preferred needle for working small circumferences, that gets you gauge;
Needle B: 40cm // 16-inch circular needle, double-pointed needles, or preferred needle for working small circumferences, one size smaller than Needle A;
5 stitch markers;
Tapestry needle.
GAUGE
16 sts x 24 rows = 10cm // 4″”
in stockinette worked in the round, washed.
Suggested needle size = 5.5mm // US9
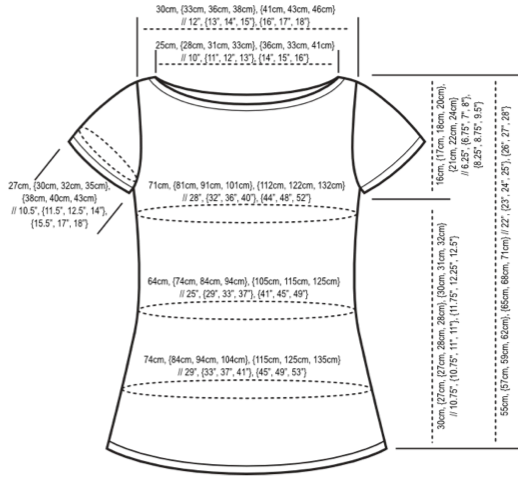
SIZING & DIMENSIONS
Instructions are given for approximate chest circumferences:
71cm, {81cm, 91cm, 101cm}, {112cm, 122cm, 132cm} // 28″, {32″, 36″, 40″}, {44″, 48″, 52″};
Maggie May is designed to fit with minimal ease, but this gauge is quite forgiving. As a guideline, these sizes will fit +/ 8cm // 3” on either side, but you may prefer to go up or down a needle size in order to have a looser or tighter gauge.
Numbers provided in the pattern are set out in the order of sizes that appear above. You may find it helpful to mark or highlight your size and corresponding numbers in the pattern.
ABBREVIATIONS
k = knit
p = purl
sl m = slip marker
pm = place marker
p2tog = purl 2 together
k2tog = knit 2 together
ssk = slip the next 2 sts as if to knit, return them to LH needle as they appear, knit together
m1R (pwise) = insert LH needle into the bar (between last st and next st) from back to front; knit (purl) through the front loop
m1L (pwise) = insert LH needle into the bar (between last st and next st) from front to back; knit (purl) through the back loop
w + t = wrap and turn; work a short row turn here, whichever you like (see APPENDIX i).
YOKE
With MC, cast on 80, {90, 98, 106}, {114, 122, 130} stitches using a mediumstretchy method, e.g. longtail, cable. Join to work in the round.
Place marker for start of round.
Knit once around.
Set up round: Sl m, k 13, {15, 16, 18}, {19, 20, 22}, pm, k 7, {7, 8, 9,} {10, 10, 11}, pm, k 2, pm, k 36, {42, 46, 48}, {52, 58, 60}, pm, k 2, pm, k 7, {7, 8, 9,} {10, 10, 11}, pm, k 13, {15, 16, 18}, {19, 20, 22}.
Stitches are increased either side of the shoulder stitches to form the front and back of the garment, while working short rows to shape the front collar.
Row 1 [RS]: Sl m, k to m, sl m, * k to m, m1R, sl m, k 2, sl m, m1L, repeat from * once, k to m, remove m, w + t.
4 sts increased.
Row 2 [WS]: * P to m, m1L pwise, sl m, p 2, sl m, m1R pwise, repeat from * once, p to m, remove m, w + t.
4 sts increased.
Row 3 [RS]: * K to m, m1R, sl m, k 2, sl m, m1L, repeat from * once, k to wrapped stitch and work to complete, k 4, {5, 5, 6}, {6, 7, 7}, w + t.
4 sts increased.
Row4[WS]: * P to m, m1L pwise, slm, p2, slm, m1R pwise, repeat from * once, p to wrapped stitch and work to complete, p 4, {5, 5, 6}, {6, 7, 7}, w + t. 4 sts increased.
Row 5 [RS]: * K to m, m1R, sl m, k 2, sl m, m1L, repeat from * once, k to wrapped stitch and work to complete, k 6, {6, 7, 7}, {8, 8, 9}, w + t.
4 sts increased.
Row 6 [WS]: * P to m, m1L pwise, sl m, p 2, sl m, m1R pwise, repeat from * once, p to wrapped stitch and work to complete, p 6, {6, 7, 7}, {8, 8, 9}, w + t. 4 sts increased.
24 sts increased in total = 104, {114, 122, 130}, {138, 146, 154} sts on the needles:
52, {56, 60, 66}, {70, 72, 78} sts for front;
48, {54, 58, 60}, {64, 70, 72} sts for back;
2 sts between each pair of shoulder markers.
In the next row, you will begin to shape the top of the sleeve caps while completing the short rows:
Next row [RS]: * K to m, sl m, mlL, k 2, m1R, sl m, repeat from * once, k to wrapped stitch and work to complete, k to end of round.
4 sts increased.
SLEEVE CAPS
Sleeve caps are worked in the round simultaneously with yoke. Stitches are increased on the inside of the shoulders markers (which will now be referred to as sleeve cap markers).
You need to complete your final wrapped stitch in the next round, but after that there will be no further wrapped stitches to work.
Sleevecap Increase round: Sl m, * k to m, sl m, mlL, k to m, m1R, slm, repeat from* once, k to end of round.
4 sts increased between sleeve cap markers.
Repeat the last round 1, {1, 1, 2}, {2, 3, 3} more times for a total of 8, {8, 8, 10}, {10, 12, 12} sts between each pair sleeve cap markers.
Sleeve caps are increased every other round to achieve desired arm circumference.
Even round: Sl m, k to end.
Repeat Sleevecap Increase Round as above.
Repeat the last two rounds 11, {11, 11, 10}, {10, 9, 9} more times for a total of 32 sts between each pair of sleeve cap markers across all sizes.
Sizes 2, 3, 4, 5, 6, 7 only:
Repeat the last two rounds 3 more times for a total
of 38 sts between each pair of sleeve cap markers.
Sleeve caps continue to be increased every other round while body stitches are increased at the same time.
All sizes:
Work Even Round as above.
Increase round 2: Sl m, * k to 1 st before m, m1R, k 1, sl m, m1L, k to m, m1R, sl m, k1, m1L, repeat from * once, k to end of round.
8 sts increased: 4 sts increased between each pair of sleeve cap markers; 4 sts increased outside of sleeve cap markers.
Repeat the last two rounds 1, {2, 4, 7}, {8, 11, 12} more times.
40, {44, 48, 54}, {56, 62, 64} sts between each pair of sleeve cap markers;
108, {122, 138, 158}, {170, 190, 202} sts outside of sleeve cap markers (body stitches).
Work one more Even Round as above.
SLEEVES
Body stitches are held on the working needle while sleeve stitches are worked on separate needles (DPNs or other choice of needles for working small circumferences).
Additional stitches are cast on for underarms and sleeve caps are finished off with a raw edge.
Next round: Sl m, k to m, switch to DPNs, k 40, {44, 48, 54}, {56, 62, 64}, cast on 3, {4, 4, 2}, {5, 2, 5} sts using backwards loop method.
Sleeve sts total 43, {48, 52, 56}, {61, 64, 69}. Join to work in the round. Pm for start of round.
Next 2 rounds: Sl m, k to end.
Bind off: P2tog, * transfer the st remaining on RH needle back to LH needle, p2tog, repeat from * until no more sts remain on LH needle, pick up first st bound off at start of round, p2tog and pull working yarn through.
Snip yarn and weave in end.
Next round: Join yarn and pick up 3, {4, 4, 2}, {5, 2, 5} sts from underarm caston sts, k to m, switch to DPNs, k 40, {44, 48, 54}, {56, 62, 64}, cast on 3, {4, 4, 2}, {5, 2, 5} sts using backwards loop method.
Work right sleeve as left. Both sleeves are now complete.
Next round: Join in yarn and pick up 3, {4, 4, 2}, {5, 2, 5} sts from underarm caston sts, k to m, remove m, k 30, {34, 38, 42}, {47, 50, 55}, pm for new start of round.
Body sts total 114, {130, 146, 162}, {180, 194, 212}.
BODY
The body is worked seamlessly in the round from underarm to bottom edge. Princess darts and gentle waist shaping are written into the pattern; omit either or both for a boxier fit.
Optional: Change to CC1 for the first half of the following even rows, then change to CC2.
Side seam placement round: Sl m, k 54, {62, 70, 78}, {86, 94, 102}, pm, k to end.
If you wish to work a faux side seam, you can slip the stitch immediately following the marker on alternate rounds.
Next 24, {25, 26, 27}, {29, 31, 33} rounds: Sl m, k to m, sl m, k to end.
WAIST SHAPING
Princess darts are placed in the approximate centre third of front sts. Different bust shapes may find narrower or wider placement more flattering. Experiment to see what works for you.
Side shaping is worked at the same time, at half the rate of the dart shaping.
Dart set up round: Sl m, k to m, sl m, k 20, {23, 26, 28}, {32, 34, 37}, pm, k 20, {22, 24, 28}, {30, 32, 36}, pm, k to end.
Full decrease round: Sl m, ssk, k to 2 sts before m, k2tog, sl m, k to 2 sts before m, k2tog, sl m, k to m, sl m, ssk, k to end.
4 sts decreased.
Next 2 rounds: Sl m, * k to m, sl m, repeat from * twice, k to end.
Princess seam round: Sl m, k to m, sl m, k to 2 sts before m, k2tog, sl m, k to m, sl m, ssk, k to end.
2 sts decreased.
Next 2 rounds: Sl m, * k to m, sl m, repeat from * twice, k to end.
Repeat the last 6 rounds (from Full Decrease Round).
6 sts decreased.
100, {118, 134, 150}, {168, 182, 200} sts on the needles.
Next round: Sl m, k to m, sl m, remove m, k to m, remove m, k to end.
Next 10, {10, 10, 10}, {12, 12, 12} rounds: Sl m, k to m, sl m, k to end.
HIP SHAPING
Following existing markers, stitches are increased at the sides using paired increases.
Hip increase round: * Sl m, k 1, m1L, k to m, m1R, repeat from * once, k to end.
4 sts increased.
Next 3 rounds: Sl m, k to m, sl m, k to end.
Repeat the last 4 rounds (from Hip Increase Round) three more times.
12 sts increased.
116, {134, 150, 166}, {184, 198, 216} sts on the needles.
The body is worked straight to the hemline and finished with a raw edge.
Optional: Continue in CC2 for the first third of the following even rows, then change to MC.
Next 30, {32, 32, 34}, {34, 36, 36} rounds: Sl m, k to m, sl m, k to end.
Bind off: P2tog, * transfer the st remaining on RH needle back to LH needle, p2tog, repeat from * until no more sts remain on LH needle, pick up first st bound off at start of round, p2tog and pull working yarn through.
Snip yarn and weave in end.
FINISHING
Weave in ends.
Block gently to the dimensions shown on the schematic (or your custom dimensions).
Wear with the confidence of youth life.
APPENDIX i (A NOTE ON SHORT ROWS)
I use German Short Rows, which are a pinless variation on Japanese Short Rows – I really recommend this method if you haven’t already tried it. Rox has a useful photo tutorial on Ravelry (need to be signed in to view). Rox also has detailed YouTube videos for turning on RS (knit to purl) and turning on WS (purl to knit).
Want to know more about different short row methods? TECHknitter has prepared a comprehensive resource.
APPENDIX ii: FITTING NOTES
These notes will support you to tailor specific dimensions of the garment more closely to your unique body shape:
SHOULDER WIDTH
This is the most important measurement to get right. Use the schematic on page 2 to cast on for the size with the shoulder width measurement closest to your actual shoulder measurement. If you are between sizes, choose the smaller size. The following paragraphs will help you adjust the rest of the garment to fit your individual dimensions.
ARM CIRCUMFERENCE
The cap sleeves are designed with 23cm // 1” positive ease. If this will result in your sleeves being too tight or loose, you can change the number of increases in the sleeve caps. Using the schematic, choose the finished sleeve circumference you would like to knit to. During the Sleeve Caps section, follow the numbers given for the new sleeve size. You may need to begin the simultaneous body increases earlier or later in order to reach the underarm at the same point.
ARMSCYE DEPTH
This is determined by the row gauge. Your increase intervals may need to be adjusted if your row gauge is different to that stated in the pattern. If your arm and bust measurements are correct, but the underarms still feel tight, it may be that your armscye is too small. In which case, add some even rounds before separating the sleeves and body.
BUST CIRCUMFERENCE
Maggie May is designed for minimal ease around the bust, although the combination of ease and shaping does allow for +/ 810cm // 34” ease around the bust.
If you think you do need extra room in the front of your sweater only, follow instructions for the bust size given on the schematic which most closely matches your actual shoulder (and desired arm measurements). After 68 increase rounds of the Sleeve Caps, increase stitches on the front sides of your markers every increase round, to achieve the body stitches required for the instructions corresponding to your actual bust size.
WAIST & HIP CIRCUMFERENCE
Maggie May is designed for a relaxed fit around the waist, before settling gently on the hips. If you want a more snug or loose fit at either of these points, you can change the number of side decreases and increases. You may have to shorten or lengthen the row intervals between shaping rows to do this.
If the difference between your bust and waist size varies significantly, you may want to incorporate the instructions above for bust and waist alterations by increasing or decreasing the shaping at the princessseam darts by shortening or lengthening the row intervals between shaping rows, or working double decreases at the side seams.
SAMPLES & FITTING INFORMATION
Both the purple/grey colourblock sample and the olive/white marl sample are customised following the above directions.
The colourblock sample was worked in 81cm size as written with the addition of extra bust increases and waist decreases, as described above, to achieve an 86cm bust (modelled on a 90cm actual bust).
The marled sample was worked in 81cm size as written with the addition of extra bust increases and waist decreases to achieve 91cm bust as written (modelled on a 94cm actual bust).